
microwave sugar wax recipe is one of those things I kept seeing online and thinking, okay, that can’t really be that easy. Then I paid for a last minute wax once and basically sprinted home to figure out a DIY option. If you’ve ever looked at salon prices, had a rough shave day, or just wanted a smoother routine without a lot of fuss, you’re in the right place. This is the beginner friendly version that doesn’t require special equipment or fancy ingredients. I’ll walk you through what to expect, what it should look like, and how to use it without stressing yourself out. 
Table of Contents
What is sugaring?
Sugaring is a hair removal method that uses a sticky sugar paste to grab hair and lift it out from the root. It’s kind of like waxing, but the paste is usually made from simple kitchen staples like sugar, lemon, and water. The big idea is that you’re using a gentle, water soluble paste instead of resin based wax.
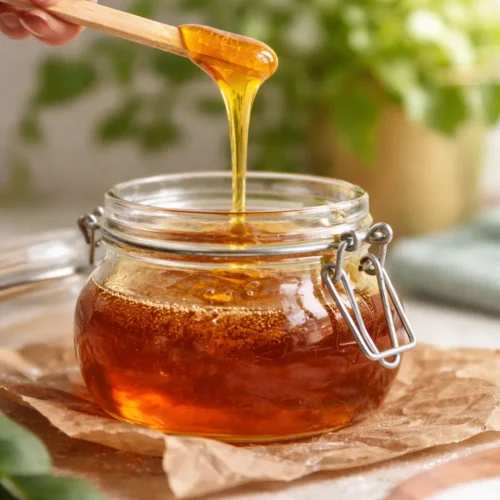
Traditionally, sugaring paste is cooked on the stove, but I’m sharing the microwave version because it’s faster and a lot less intimidating for first timers. The texture is everything here. You want it to be like warm honey when it’s hot, then it thickens as it cools.
If you’re into body care DIYs, you might also like pairing this with a scrub day. I’m a fan of doing a gentle exfoliation the day before, like this vanilla brown sugar body scrub that smells like dessert but acts like a serious skin polisher.
Benefits of Sugar Waxing
I’m not here to pretend sugaring is magic and perfect for everyone, but it does have some real perks. The main one for me is how simple the ingredients are. I like knowing exactly what I’m putting on my skin.
Here are a few benefits people love about sugar waxing:
- Simple ingredients that you probably already have at home
- Water soluble, so cleanup is easier than traditional wax
- Can feel less irritating for some people, especially with good prep
- Great for small areas like upper lip, underarms, and touching up legs
- Hair grows back softer for many people when you do it consistently
“I tried this on my underarms after watching a bunch of tutorials, and I was shocked it actually worked. Cleanup was so easy, and my skin felt smoother than shaving.”
How to Make Sugar Wax
Okay, here’s the part you came for. This microwave sugar wax recipe is my go to because it’s quick, and you can make a small batch without committing to a big pot on the stove. The one thing I’ll say up front is this: microwave strength varies a lot. So watch it closely the first time.
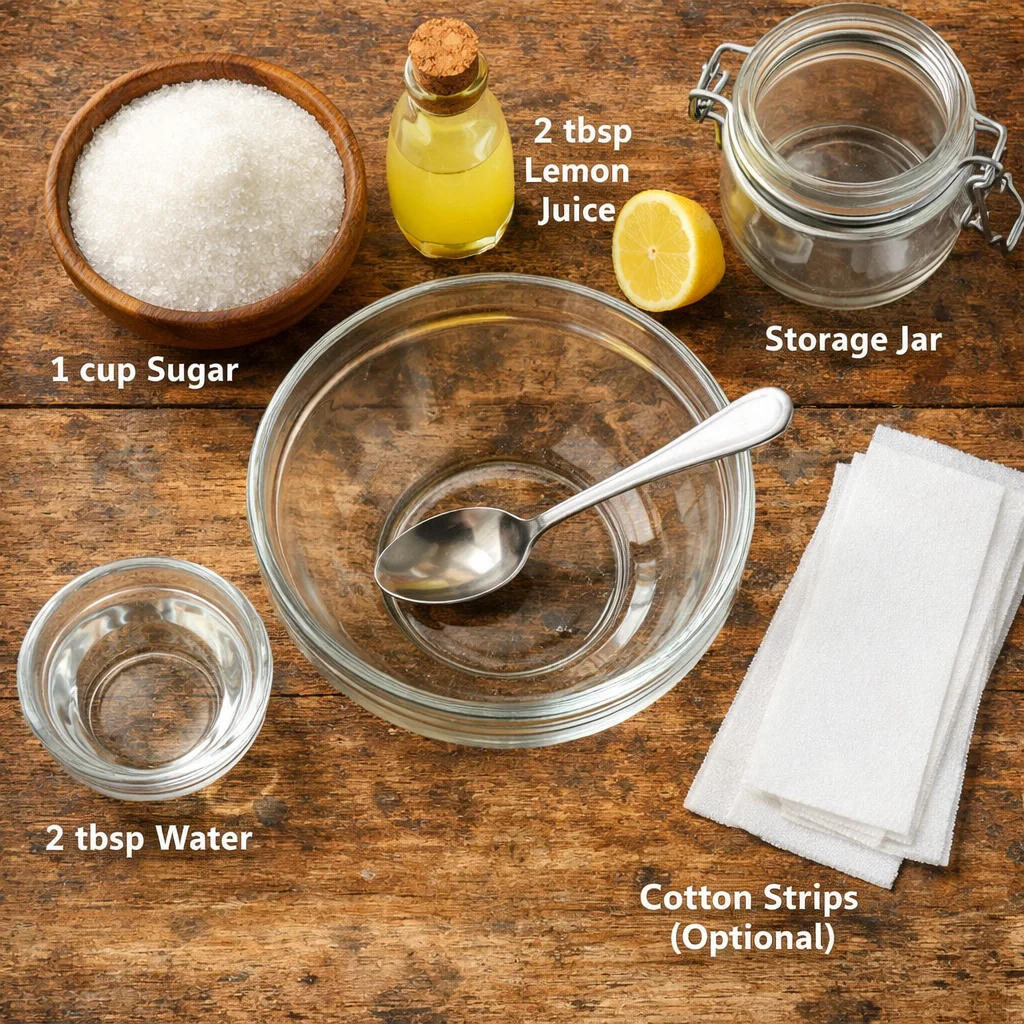
Ingredients and what you will need
Keep it simple. If you can measure and stir, you’ve got this.
- 1 cup white granulated sugar
- 2 tablespoons lemon juice (bottled is fine)
- 2 tablespoons water
- A microwave safe glass bowl (not plastic)
- A spoon for stirring
- A jar or heat safe container for storing
- Optional: cotton strips, or you can use it strip free once it’s cooled and thick
Directions:
1) Add the sugar, lemon juice, and water to your glass bowl. Stir until it looks like wet sand.
2) Microwave for 30 seconds, then stir. Keep microwaving in short bursts of 15 to 25 seconds, stirring each time.
3) Watch for the color to change to a light golden amber, kind of like warm maple syrup. If it turns dark brown fast, it’s overcooked and will be too hard and brittle.
4) Once it’s a nice golden color, let it sit on the counter for 10 to 20 minutes. It will be very hot at first. Please don’t test it on your skin right away.
This is the tricky part for beginners: figuring out the right consistency. When it’s ready to use, it should be thick but still pliable. If it’s runny, it’s too hot and needs more cooling time. If it becomes rock hard, it was cooked too long. You can sometimes fix too hard paste by microwaving for just 5 seconds and adding a tiny splash of water, then stirring carefully.
One more tip from my own trial and error: don’t walk away while it microwaves. Sugar goes from “not ready” to “whoops” in a blink. The microwave sugar wax recipe really rewards patience and short bursts.
How to Apply Sugar Wax
Application is where people either fall in love with sugaring or swear it off forever, so let’s make it easy. Start with a small area the first time. I always recommend testing on your lower leg before going for underarms or bikini area.
Step by step application (beginner friendly)
1) Start with clean, dry skin. No lotion, no body oil. If you’re sweaty, pat on a tiny bit of cornstarch or baby powder.
2) Check the temperature. Touch a tiny bit with your fingertip. It should feel warm, not hot.
3) Apply against hair growth. Press the paste onto your skin in the opposite direction your hair grows. This helps it grip the hair.
4) Remove with hair growth. Hold your skin taut and pull the wax off quickly in the direction the hair grows. Keep the pull close to the skin, not straight up.
5) Repeat in small sections. Don’t try to do a huge area in one go. Small patches are less painful and easier to control.
If you’re using strips, press the strip on top, smooth it down firmly, then pull it off quickly while holding the skin tight. If you’re going strip free, you’ll need the paste a bit thicker so you can flick it off with your hand.
And yes, it stings a bit. I’m not going to lie to you. But it’s usually quick, and the more consistent you are with your routine, the easier it tends to feel.
What to do Before and After You Sugar Wax
This is the part that makes the difference between smooth skin and a bunch of little bumps. A tiny bit of prep and aftercare goes a long way.
Before you sugar wax
Here’s my simple checklist:
Let hair grow a little. Ideally about 1/8 to 1/4 inch. If it’s too short, the paste can’t grab it well.
Exfoliate the day before. Not right before, because that can make your skin extra sensitive. If you want an easy option, this vanilla brown sugar body scrub is gentle but still does the job.
Skip heavy creams or oils. Sugar paste likes clean, dry skin.
Avoid right after a hot shower. Warm skin can be more sensitive. I do better when my skin has cooled down.
After you sugar wax
Rinse with cool water. Since sugar wax dissolves, you can remove residue easily without scrubbing your skin.
Wear loose clothing. Especially if you did underarms or bikini line. Tight fabric can rub and irritate.
Avoid heat and sweat for 24 hours. That means no hot baths, saunas, or intense workouts right after.
Moisturize gently. Use a simple, fragrance free lotion if your skin feels dry.
Exfoliate again after 48 hours. Light exfoliation helps prevent ingrown hairs.
Once you get your routine down, this microwave sugar wax recipe becomes one of those low key habits that saves time and money. The aftercare is what keeps it feeling worth it.
Common Questions
Q: Why did my sugar wax turn hard like candy?
A: It cooked too long. Next time use shorter microwave bursts and stop when it’s light golden. You can sometimes soften it with a 5 second warm up and a tiny splash of water.
Q: Can I store leftover sugar wax?
A: Yes. Keep it in a sealed jar at room temperature. To reuse, microwave in very short bursts until it’s warm and pliable again.
Q: How painful is sugar waxing compared to shaving?
A: Shaving isn’t painful, but it can cause razor burn and stubble fast. Sugaring stings for a moment, but you stay smoother longer. Doing small sections helps a lot.
Q: What areas work best for beginners?
A: Lower legs and arms are easiest to learn on. Underarms are doable but sweaty skin can make it tricky. I’d wait on bikini area until you feel confident.
Q: My wax isn’t grabbing hair. What went wrong?
A: Usually the hair is too short, the skin has lotion on it, or the paste is too warm and runny. Let it cool a bit more and make sure the skin is dry.
A smooth skin pep talk to wrap it up
If you’ve been wanting a cheaper, simpler way to get smooth skin at home, this microwave sugar wax recipe is honestly a solid place to start. Keep your batch small, watch the color, and don’t rush the cooling time. The first try might feel a little clumsy, but it gets easier fast once you learn the texture. And if you want another trusted walkthrough, check out Learn How to Make Sugar Wax With This Easy DIY Recipe for extra tips and timing guidance. You’ve got this, and your future self is going to love that smooth, clean feeling.
Microwave Sugar Wax
Materials
Main Ingredients
- 1 cup white granulated sugar
- 2 tablespoons lemon juice bottled is fine
- 2 tablespoons water
Equipment
- 1 microwave safe glass bowl not plastic
- 1 spoon for stirring
- 1 jar or heat safe container for storing
- optional cotton strips or use it strip free once it’s cooled and thick
Instructions
Preparation
- Add the sugar, lemon juice, and water to your glass bowl. Stir until it looks like wet sand.
- Microwave for 30 seconds, then stir. Keep microwaving in short bursts of 15 to 25 seconds, stirring each time.
- Watch for the color to change to a light golden amber, similar to warm maple syrup. If it turns dark brown fast, it’s overcooked.
- Once it’s a nice golden color, let it sit on the counter for 10 to 20 minutes until it cools.
Application
- Start with clean, dry skin. No lotion or body oil.
- Check the temperature; it should feel warm, not hot.
- Apply against hair growth, pressing the paste onto the skin in the opposite direction.
- Remove with hair growth by pulling the wax off quickly in the direction the hair grows.
- Repeat in small sections for better control and less pain.
