
DIY protein hair mask season always finds me right after I do something a little too ambitious with my hair. You know the vibe, one more bleach session, one more hot tool day, and suddenly my ends feel like crunchy noodles. If your hair is overprocessed, it can start snapping, stretching weird when wet, or just sitting there looking tired no matter what you do. I put this post together because a simple protein boost can make a huge difference, fast. Not a miracle, but a very real “oh wow, that feels better” moment.
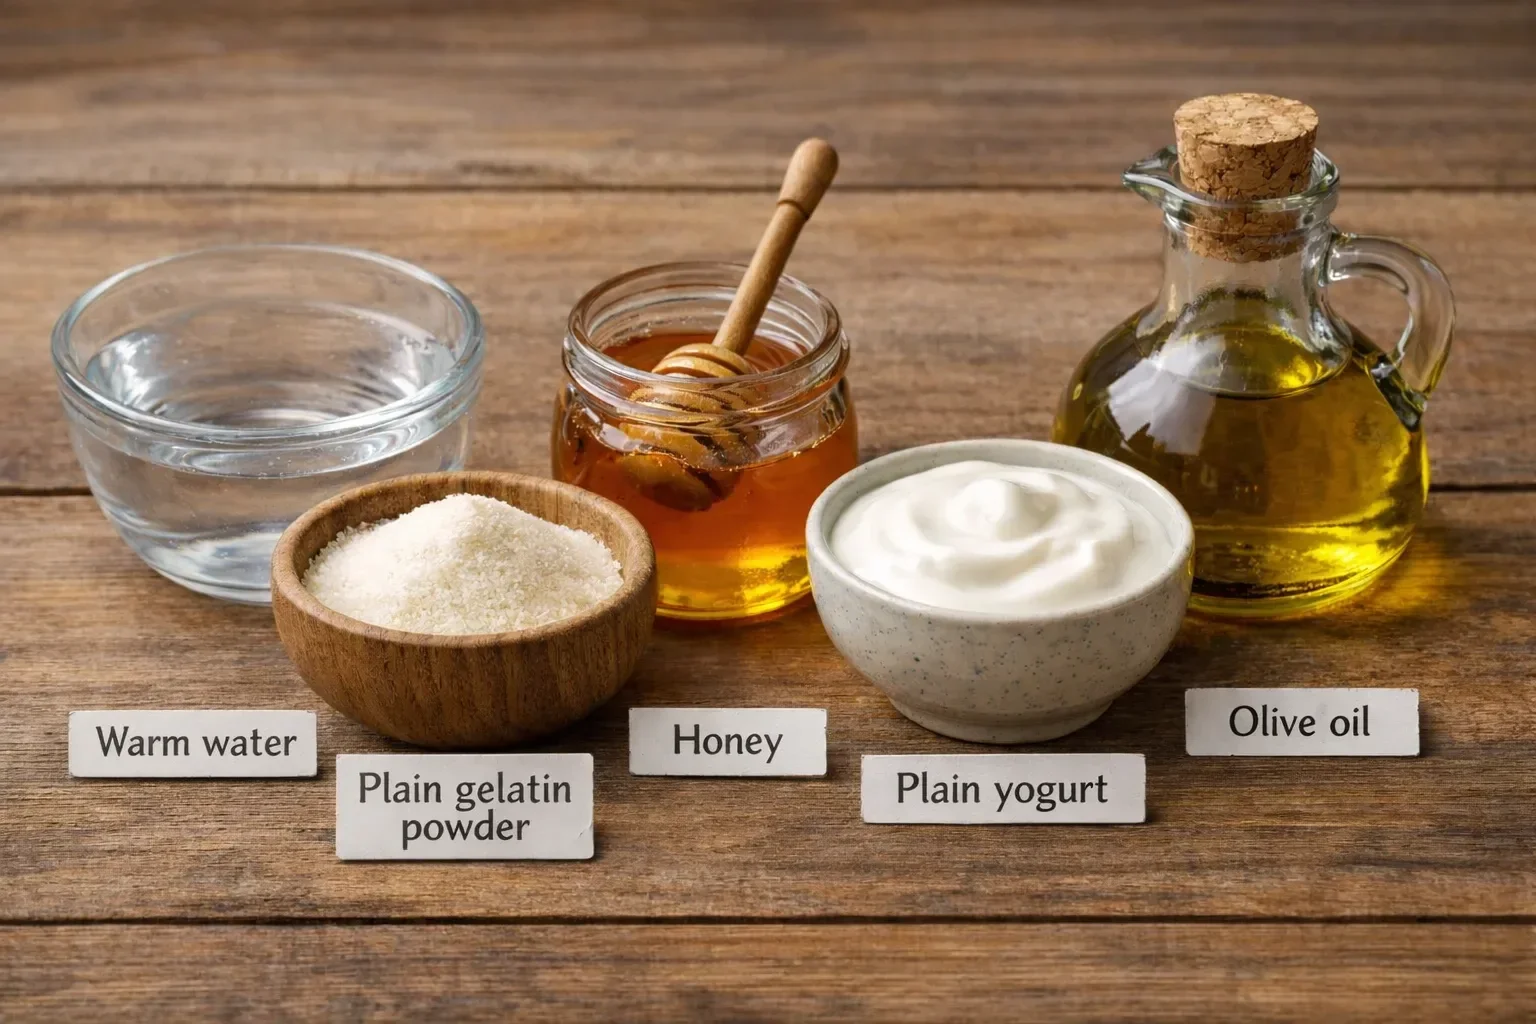
Table of Contents
Our Hair is Mostly Protein
Here is the thing most of us do not think about until our hair starts acting up. Hair is made mostly of a protein called keratin. That is why when hair gets overprocessed from bleaching, coloring, straightening, perms, or too much heat, it can start feeling weak and hollow.
When I say “protein” in a hair care sense, I mean ingredients that can temporarily patch up weak spots and help your strands feel stronger. It is kind of like when you make a soup and it tastes thin, so you add something hearty to give it body. Protein gives your hair that body again, at least for a while.
Overprocessed hair usually has raised cuticles and damaged inner structure, so moisture alone sometimes is not enough. Moisture is important, but if the hair has lost strength, it needs support too. That is why a DIY protein hair mask can be such a good stepping stone when your hair feels like it is on the edge.
I learned this the hard way after going lighter for summer and then swimming a lot. My hair was soft, but it was also kind of mushy. That is classic “needs some protein” territory.
How do you know if your hair needs protein?
It is not always obvious because dry hair and protein hungry hair can look similar in the mirror. The difference is in how it feels and behaves. If your hair is overprocessed, you want to look for a few signs before you grab the mixing bowl.
Here are the clues I personally watch for:
- Too stretchy when wet, like it pulls and does not bounce back
- Breakage that looks like little snapped pieces, especially around the crown or ends
- Hair feels gummy or extra fragile right after washing
- Curls or waves losing shape, even with good styling
- Color treated hair that suddenly feels weaker after a salon visit
If you are unsure, do a quick mini test. Wet one strand, gently stretch it, and see what it does. If it stretches a lot and feels like it might not recover, that is often a sign you need protein. If it snaps immediately with no stretch at all, it may be too dry and needs moisture first.
Also, pay attention to your routine. If you have been doing lots of moisturizing masks and oils but your hair still feels limp and weak, a protein step might be the missing piece. I like pairing protein day with a simple leave in afterward, and if you want one of my favorites, this castor oil leave in hair conditioner is a good follow up when your ends feel thirsty.
What does a protein treatment do?
A protein treatment is basically a temporary “reinforcement” for damaged strands. It can help hair feel stronger, look smoother, and behave more predictably. I am saying “temporary” on purpose because nothing truly reverses severe damage. But you can absolutely improve how your hair looks and feels while you grow out the rough parts.
This is what I notice when I use a DIY protein hair mask consistently, like once every couple of weeks:
Less breakage when brushing and styling. My hair still sheds because everyone sheds, but the snapping slows down.
More structure. My waves clump better and the ends do not look as wispy.
Smoother feel. Not always silky like a salon blowout, but less rough and less frizzy.
One important note though. Too much protein can make hair feel stiff or straw like. So we are aiming for balance. If your hair starts feeling hard, brittle, or tangly after treatments, pause and switch to moisture focused care for a bit.
And because I know people like real experiences, not just claims, here is one little note from a friend who tried this after her highlights got a bit out of hand:
“After one use my hair stopped feeling gummy when I rinsed it out. It did not fix everything overnight, but it looked smoother and I had way less breakage when I detangled.”
Learn About the Ingredients In This Protein Treatment
Ok, this is the fun part because it feels like making a quick kitchen recipe. The goal is protein plus slip, so you are not left with a stiff mess. This mix is simple, affordable, and easy to rinse out.
What you will need
- 1 tablespoon plain gelatin powder
- 3 tablespoons warm water
- 1 tablespoon honey
- 2 tablespoons plain yogurt
- 1 teaspoon olive oil or avocado oil
- Optional: a few drops of your favorite hair friendly essential oil, like lavender
Gelatin is the main protein hit here. It is not identical to keratin, but it is rich in amino acids and many people find it gives a “stronger hair” feel.
Yogurt adds a little protein plus softness. It also helps the mixture feel creamy so it spreads easily.
Honey is a humectant, meaning it helps attract moisture. This matters because protein alone can feel too firm.
Oil is for slip and comfort. Overprocessed hair tangles easily, and a tiny bit of oil helps you rinse without drama.
How I mix and apply it
First I dissolve the gelatin in warm water and stir until it looks smooth. Give it a minute because it thickens fast. Then I mix in yogurt, honey, and oil until it looks like a creamy sauce.
I apply it to damp hair, focusing on the mid lengths and ends. If your roots are oily, skip the scalp. I twist my hair up, throw on a shower cap, and set a timer for 10 to 20 minutes. If your hair is very damaged, start with 10 the first time.
Rinse with lukewarm water, then follow with a moisturizing conditioner. Do not skip that step. Think of protein as structure and conditioner as the softness.
If you are into making your own personal care like I am, you might enjoy browsing natural hair care ideas too. I get so many little routine upgrades from simple DIYs like that.
Would You Rather Buy A Protein Treatment than Make It?
I get it. Sometimes you are busy, your bathroom is already full of half used bottles, and you just want something that works without the mixing bowl. Buying a protein treatment can be a great option, especially if your hair is extremely fragile and you want something formulated to be consistent.
Here is how I decide:
If my hair is mildly stressed, like dull, frizzy, and a bit breaky, I usually go for the DIY protein hair mask because it is quick and I control the ingredients.
If my hair is seriously compromised, like snapping a lot or feeling uneven and rough no matter what, I will often use a store bought mask from a reputable brand and follow the directions exactly. Look for labels that mention hydrolyzed proteins, keratin, silk protein, wheat protein, or rice protein. Also look for fatty alcohols and conditioning ingredients so it does not leave hair stiff.
A good middle ground is doing DIY sometimes and purchased treatments other times. I also like keeping the rest of my routine gentle, like lower heat, fewer tight hairstyles, and more patience when detangling. Overprocessed hair responds to kindness, honestly.
Common Questions
How often should I use a DIY protein hair mask?
For overprocessed hair, I would start with every 2 weeks. If your hair feels stronger and not stiff, you can do it weekly for a short period, but do not overdo it.
Can I leave the mask on longer for better results?
Not always. Longer can lead to stiffness, especially with gelatin. Stick to 10 to 20 minutes, then condition well.
Should I apply protein on my scalp?
If your scalp is sensitive or oily, keep it on the hair lengths. If your scalp is dry and you tolerate it well, you can apply lightly, but do not scrub hard.
What if my hair feels hard after the treatment?
That is usually protein overload. Pause protein for a few weeks and focus on moisture, gentle conditioning, and low heat styling.
Is this safe for colored hair?
Yes, generally. Just rinse gently and do not use hot water. If your color is very fresh, wait a few days after dyeing so your hair is not extra stressed.
A little pep talk before you rinse and repeat
If your hair is in that overprocessed stage where it feels like it has a personality shift, you are not alone. The best combo I have found is being consistent, not aggressive: a DIY protein hair mask now and then, lots of conditioning, and fewer harsh styling days. If you want to compare another method, this linked guide on DIY Protein Treatment For Damaged Hair – My Merry Messy Life is a helpful read and it lines up with what I have seen from gelatin based treatments. Give it a try, take notes on how your hair feels, and adjust as you go. Your hair does not need perfection, it just needs a little support and some time.
Protein Hair Mask
Materials
Main Ingredients
- 1 tablespoon plain gelatin powder Provides protein; rich in amino acids.
- 3 tablespoons warm water Used to dissolve gelatin.
- 1 tablespoon honey A humectant that attracts moisture.
- 2 tablespoons plain yogurt Adds protein and softness.
- 1 teaspoon olive oil or avocado oil Provides slip for easier application.
- a few drops hair-friendly essential oil Optional, can use lavender or other preferred oils.
Instructions
Preparation
- Dissolve the gelatin in warm water and stir until smooth, allowing it to thicken slightly.
- Mix in yogurt, honey, and oil until the mixture is creamy.
Application
- Apply the mask to damp hair, focusing on mid-lengths and ends, and skip the scalp if oily.
- Twist hair up and cover with a shower cap. Set a timer for 10 to 20 minutes.
- Rinse with lukewarm water, then apply a moisturizing conditioner.
